构建器配置
为项目配置编译器选项
编译器配置
你可以为你的项目选择一个合适编译工具(对于每一种项目,我们都提供一些选择)
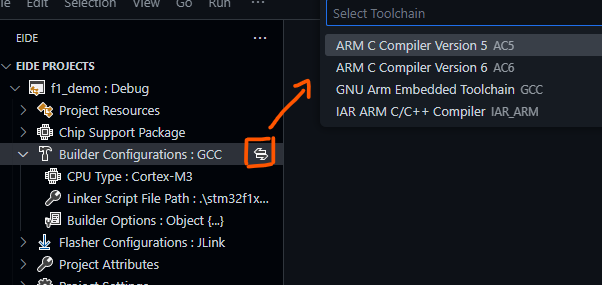
为你的代码选择合适的编译器,使用不正确的编译工具可能会导致编译失败
并且你可以为当前项目单独配置编译器的 toolchain path(编译器路径) 和 toolchain prefix(编译器前缀)
这些配置项仅在当前工作区生效,不会影响到全局的编译器设置

基本配置
每个项目都有基本的配置
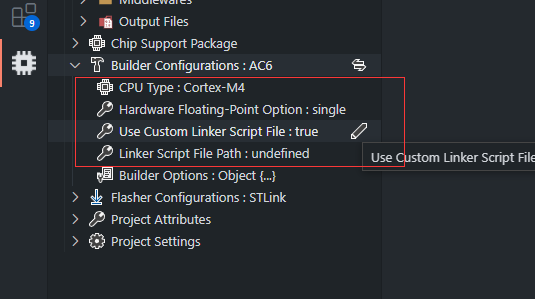
有一些基本选项,如:CPU 类型,浮点类型,链接器脚本文件路径 通常它们有固定的含义
CPU 类型: CPU 系列名称;对于 arm 项目,类似于:Cortex-M3, Cortex-M4 ...硬件浮点选项: 浮点类型,例如:sp, dp, none使用自定义的链接脚本: 此选项仅适用于Armcc/Armclang编译器。用于决定是否通过插件自动生成链接器脚本文件(Scatter File)链接脚本路径: 一个带有存储器布局的描述文件,我们称之为链接器脚本文件,比如:xxx.sct, xxx.lds, xxx.ld,它将被传递给链接器;在 keil MDK 里这个文件被称为 分散加载文件(Scatter File)RAM / FLASH 布局: 提供一个类似于 Keil 的存储器布局编辑器,用于为RAM/ROM修改地址,大小信息,当选项使用自定义链接器脚本文件为false时将显示(仅适用于使用 Armcc 或 armclang 编译器的项目)
对于不同的 编译器类型 有不同的基本配置
因此,并不是每种项目类型都会有上述字段
高级配置
除了上面描述的 基本选项,我们还提供了更详细的编译配置项
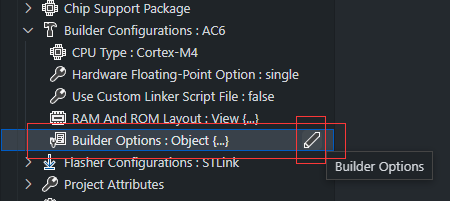
点击 修改 按钮,将打开 BUILDER OPTIONS 视图,如下:
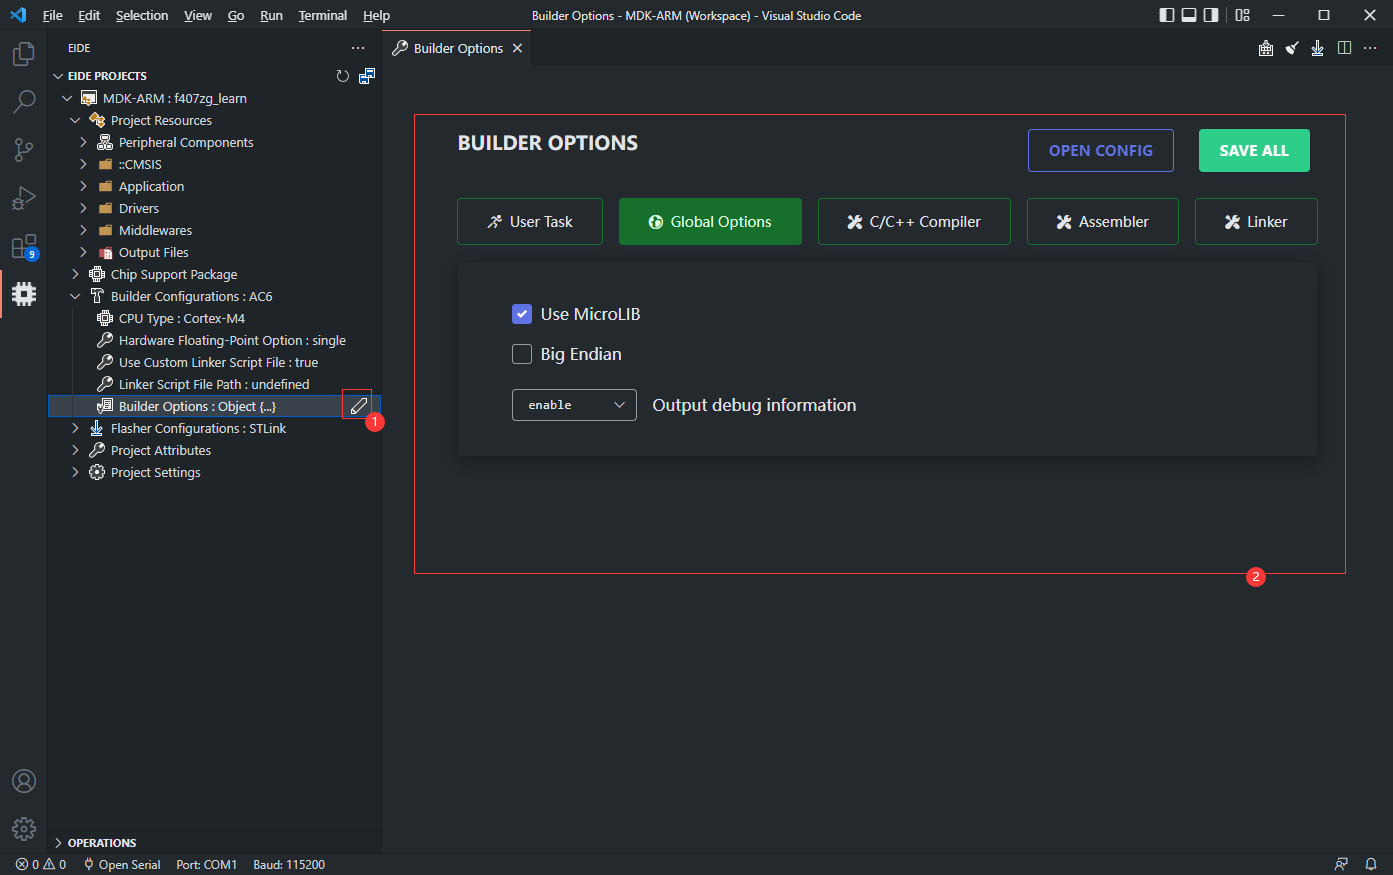
我们把配置项分为 5 个标签页,分别为 用户任务, 全局选项, C/C++ 编译器, 汇编器, 链接器.
用户任务: 您可以设置一些 shell 命令,这些命令将在构建的不同阶段执行我们有两种类型供选择:
pre-build,post-buildpre-build命令将在构建开始之前执行post-build命令将在构建完成后执行这里有一些示例命令.
全局选项: 一些被应用到C/C++ 编译器,汇编器和链接器的全局选项.C/C++ 编译器: 特定于 C/C++ 编译器的选项汇编器: 特定于汇编器的选项链接器: 特定于链接器的选项
单击 Save 按钮或者按下 ctrl+s 以保存你的配置,我们不支持自动保存
如果你只想为个别的源文件单独设置选项,请参考这个:附加编译参数到源文件
可用的变量
我们支持在构建器配置中使用一些特定的变量
| 变量名 | 描述 | 备注 |
|---|---|---|
${OutName} | .o 文件名 | 相对路径,无文件后缀名 |
${OutDir} | .o 目录路径 | 相对路径 |
${FileName} | 源文件名 | 相对路径,无文件后缀名 |
${FileDir} | 源文件目录路径 | 相对路径 |
${ArgsFile:ARGS_FILE_PATH} | 从文件 ARGS_FILE_PATH 中导入编译参数 | 路径不得包含特殊符号及非ASCII码 |
示例:
在使用
Armcc编译.c文件时,同时输出asm文件:添加
--asm --asm_dir="${OutDir}"参数到Builder Options->C/C++ Compiler->Other C Compiler Options中从
./my_cmd.args.txt文件中导入一些 C 编译器参数:添加
${ArgsFile:./my_cmd.args.txt}参数到Builder Options->C/C++ Compiler->Other C Compiler Options中
用户任务命令
我们支持在构建项目 之前 或者 之后 执行一些构建器任务。
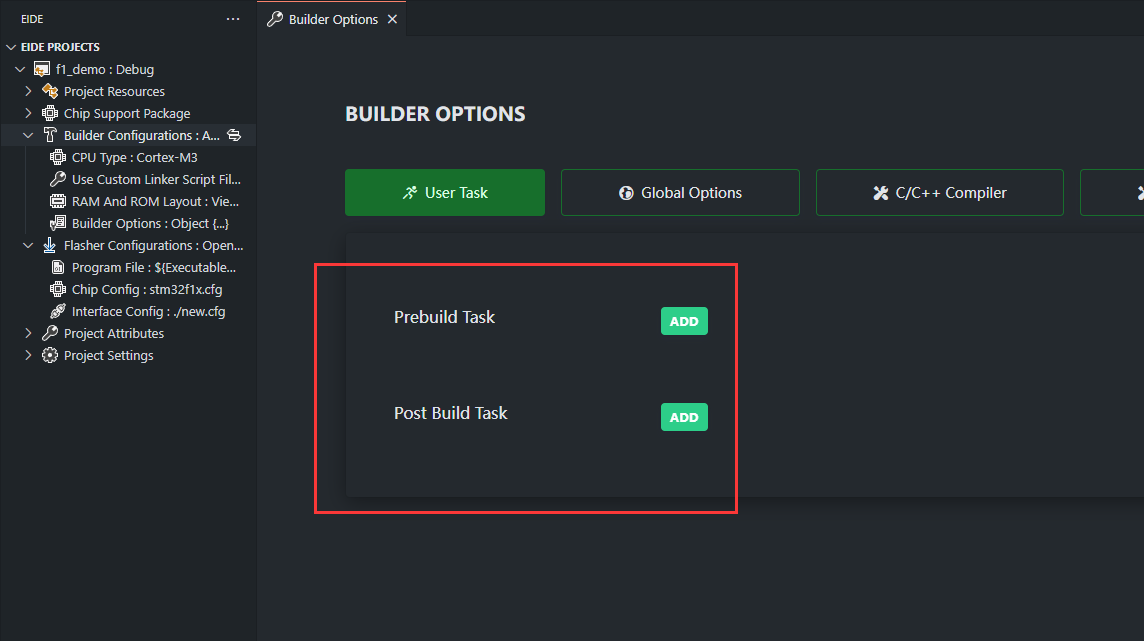
这里有一些示例命令
# [gcc toolchain] 仅运行预处理器程序,执行预处理操作
${CompilerPrefix}gcc ${EIDE_CUR_COMPILER_CC_BASE_ARGS} -E -P -o ${OutDirBase}/daplink.ld ./xxx/daplink.ld
${CompilerPrefix}gcc ${EIDE_CUR_COMPILER_CC_BASE_ARGS} -E -P -o ${OutDirBase}/abc.c ./xxx/abc.c

# [For Windows10] 执行 windows bat 脚本
.\xxx\xxx\xxx.bat [script arguments...]

# [For Windows10] 打印内部的环境变量 envs
powershell -Command ls env:

# [For Windows10] 将 .hex .bin 文件复制到 dist 目录
mkdir .\dist & copy /B "${ExecutableName}.hex" .\dist\ & copy /B "${ExecutableName}.bin" .\dist\

# [gcc toolchain] 打印 gcc 的版本号
${CompilerPrefix}gcc -v

# 使用 armcc 生成 s19 格式的文件
fromelf --m32combined -o "${ExecutableName}.s19" "${ExecutableName}.axf"

# 使用 gcc 生成 hex 文件
${CompilerPrefix}objcopy -O ihex "${ExecutableName}.elf" "${ExecutableName}.hex"

# 使用 gcc 生成 bin 文件
${CompilerPrefix}objcopy -O binary "${ExecutableName}.elf" "${ExecutableName}.bin"

# 使用 hex2bin 将 hex 转换为 bin
hex2bin -b -c "${ExecutableName}.hex"
命令的跨平台兼容性:
如果要实现在 windows 和 unix 上兼容的命令,请使用 shell 命令(对于windows系统,插件内置了msys环境因此可以执行shell命令)
对于一些简单的命令,可以使用如下格式:
bash -c "命令 <参数>"
如果命令比较复杂含有多个步骤,请将命令编写在 shell 脚本中,并使用如下格式设置命令
bash -c 'chmod +x ./my_script.sh' && bash -c './my_script.sh "params 1" "params 2"'
对于 Win32 系统,我们使用 cmd.exe 执行上述的命令行
对于 Linux 系统,我们使用 /bin/bash 执行上述的命令行
用户任务变量
这里有一些变量,你可以在构建任务中使用
项目变量:
| 变量名 | 描述 | 备注 |
|---|---|---|
${ProjectName} | 项目名称 | |
${ConfigName} | 项目目标名,如:'Debug', 'Release' | |
${ProjectRoot} | 项目根目录名 | |
${OutDir} | 构建输出目录路径 | |
${OutDirRoot} | 输出目录根名称,例如:build | |
${OutDirBase} | 输出目录基本名,例如:build\Debug | |
${workspaceFolder} | vscode 工作区文件夹完整路径 | |
${workspaceFolderBasename} | vscode 工作区文件夹名称 | |
${ToolchainRoot} | 工具链根目录完整路径 | |
${targetName} | 即将废弃 | |
${re:ProjectRoot} | 项目根目录相对路径,固定值:'.' | |
${re:OutDir} | 构建输出目录相对路径,如:'build/Debug' |
编译器变量:
| 变量名 | 描述 | 备注 |
|---|---|---|
${ToolchainRoot} | 编译器根目录 | |
${CompilerPrefix} | GCC 编译器前缀,如:arm-none-eabi- | |
${CompilerId} | 编译器 ID,如:'gcc', 'sdcc', 'ac5' | |
${CompilerName} | 编译器短名称,如:'GNU Tools for Arm Embedded Processors 8-2019-q3-update' | |
${CompilerFullName} | 编译器全名称,如:'arm-none-eabi-gcc.exe (GNU Tools for Arm Embedded Processors 8-2019-q3-update) 8.3.1 20190703 ...' | |
${CompilerVersion} | 编译器版本号,如:'8.3.1' | |
${BuilderFolder} | eide 构建工具根目录路径 | |
${CompilerFolder} | 即将废弃 | |
${re:BuilderFolder} | 构建工具根目录相对路径 | |
${re:ToolchainRoot} | 编译器根目录相对路径 | |
${re:CompilerFolder} | 即将废弃 |
其他扩展的编译器变量:
| 变量名 | 描述 |
|---|---|
${EIDE_CUR_OS_TYPE} | OS 类型,'win32' or 'linux' |
${EIDE_CUR_COMPILER_ID} | 同 ${CompilerId} |
${EIDE_CUR_COMPILER_NAME} | 同 ${CompilerName} |
${EIDE_CUR_COMPILER_NAME_FULL} | 同 ${CompilerFullName} |
${EIDE_CUR_COMPILER_VERSION} | 同 ${CompilerVersion} |
${EIDE_CUR_COMPILER_PREFIX} | 同 ${CompilerPrefix} |
${EIDE_CUR_COMPILER_CC_PATH} | C 编译器完整路径 |
${EIDE_CUR_COMPILER_AS_PATH} | ASM 编译器完整路径 |
${EIDE_CUR_COMPILER_LD_PATH} | LINKER 完整路径 |
${EIDE_CUR_COMPILER_CXX_PATH} | C++ 编译器完整路径 |
${EIDE_CUR_COMPILER_CC_BASE_ARGS} | C 基本编译参数 |
${EIDE_CUR_COMPILER_AS_BASE_ARGS} | ASM 基本编译参数 |
${EIDE_CUR_COMPILER_LD_BASE_ARGS} | LINKER 基本参数 |
${EIDE_CUR_COMPILER_CXX_BASE_ARGS} | C++ 基本编译参数 |
为 Windows 内置的 Unix Shell 终端
对于 Win32,插件内置了一个 MSYS 环境(位置:C:\Users\USER_NAME/.eide\bin\builder\msys\bin)
所以你可以在 Windows 平台上执行 unix shell script
通过在 构建前/后任务 的命令行上正确使用这些程序,可以完成更多自定义处理和操作
例如:
# execute linux shell script
bash ./xxx/xxx.sh [script arguments...]

# output crc32 checksum for hex file
bash -c "crc32 \"${OutDir}/${ProjectName}.hex\""

# output sha1 checksum for hex file
bash -c "sha1sum \"${OutDir}/${ProjectName}.hex\""
所有可用的 shell 命令:
可 直接调用的 命令:
a2p awk
basename bash bison bunzip2 bzcat bzip2 bzip2recover
cat chgrp chmod chown chroot cksum cmp comm cp csplit curl cut
date dd df diff diff3 dir dircolors dirname du
echo egrep env error-mode expand expr
factor false fgrep find flex fmt fold funzip
gawk-3.1.7 gawk grep gzexe gzip
head hostname
id install install.manifest
join kill
link ln locate logname ls lzcat lzma lzmadec lzmainfo
m4 make md5sum mkdir mkfifo mknod msysmnt mv
nice nl nohup
od oldfind openssl
paste patch patch.manifest pathchk perl perl5.8.8 pgawk-3.1.7 pgawk
pinky pkg-config pr printenv printf ps ptx pwd
readlink rm rmdir
scp sdiff sed seq sftp sh sha1sum shred sleep slogin sort split
ssh-add ssh-agent ssh-keygen ssh-keyscan ssh stat strace stty su sum sync
tac tail tar tee test touch tr true tsort tty
uname unexpand uniq unlink unlzma unxz unzip unzipsfx users
vdir wc who whoami
xargs xz xzcat xzdec
yes zipinfo
仅能通过 bash -c 调用的命令:
aclocal autoconf autoheader autom4te automake autopoint autoreconf autoscan autoupdate
bashbug bzcmp bzdiff bzegrep bzfgrep bzgrep bzless bzmore
c2ph c_rehash cls clsb cmd config_data cpan cpantest crc32
dprofpp enc2xs
find2perl ftp
groups gunzip gzexe
h2ph h2xs
ifnames igawk instmodsh
ld2 libnetcfg libtool libtoolize lnkcnv lzcmp lzdiff lzegrep lzfgrep lzgrep lzless lzmore
mount msysinfo
perlbug perlcc perldoc perlivp perlld perlrebase piconv pl2pm pod2html pod2latex pod2man
pod2readme pod2text pod2usage pod_cover podchecker podselect prove psed pstruct ptar ptardiff ptee
s2p shasum splain start
umount uncompress updatedb
which xsubpp xzcmp xzdiff xzegrep xzfgrep xzgrep xzless xzmore
yacc ysh
zcat zcmp zdiff zegrep zfgrep zforce zgrep zipgrep zless zmore znew
示例:
#
# make firmware file. add timestamp, crc32 checksum
#
# [in]:
#   args(1): build output binary file path
#
# [env]:
#   ${FIRMWARE_OUT_DIR}
#   ${PRODUCT_NAME}
#   ${FIRMWARE_VERSION}
#
# [out]:
#   output firmware file to:
#     '${FIRMWARE_OUT_DIR}/${PRODUCT_NAME}_V${FIRMWARE_VERSION}_${timeStamp}_${crc32}.${fileSuffix}'
#

# convert '\' -> '/' for unix
inputFile=$(echo $1 | sed 's/\\/\//g')

crc32Val=$(crc32 "${inputFile}" | sed -E 's/.*0x([0-9a-fA-F]+).*/\1/g' | tr 'A-Z' 'a-z')
baseFileName=$(basename "${inputFile}")
fSuffix=${baseFileName##*.}

echo "make output dir: '${FIRMWARE_OUT_DIR}'"
mkdir -p ${FIRMWARE_OUT_DIR}
rm -rf ./${FIRMWARE_OUT_DIR}/*.${fSuffix}

timeStamp=$(date +%y%m%d%H%M)
firmwareName="${PRODUCT_NAME}_V${FIRMWARE_VERSION}_${timeStamp}_${crc32Val}"
firmwareOutPath="${FIRMWARE_OUT_DIR}/${firmwareName}.${fSuffix}"

echo "output firmware: '${firmwareOutPath}'"
cp "${inputFile}" "${firmwareOutPath}"