烧录器配置
烧录你的程序到芯片
我们支持多种烧录软件:
| 项目类型 | 烧录器 |
|---|---|
| 8BIT Project | stvp for stm8, stcgal, any shell command |
| Arm Project | jlink, stlink, pyocd, openocd, any shell command |
| RISCV Project | jlink, pyocd, openocd, any shell command |
你可以在项目中切换烧录器
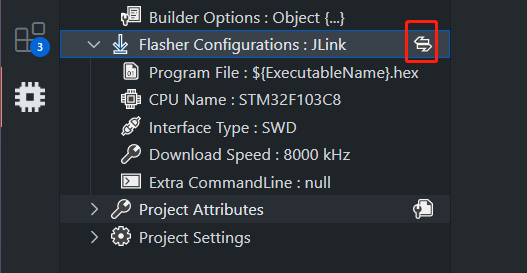
安装烧录工具
烧录工具没有集成到 EIDE 安装包中,因此在使用烧录功能之前需要安装相应的 flasher 工具
点击 烧录程序 按钮启动 flasher 程序,我们将检查你的 flasher 可执行程序,如果它还没有安装,我们将弹出一个通知,现在你可以安装或设置 flasher
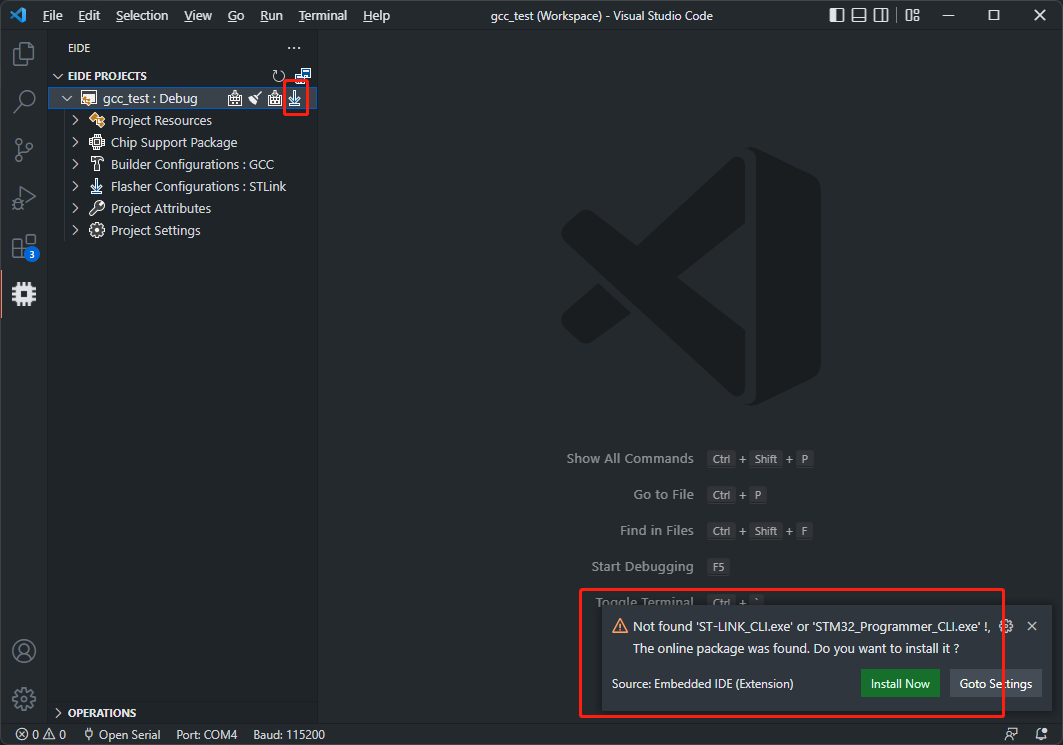
如果您想为 flasher 选择一个现有的安装位置,您需要修改 eide 的插件设置
这里是插件的 flasher 设置列表:
| Flasher | VSCode Settings ID |
|---|---|
| STVP | EIDE.STM8.STVP.CliExePath |
| JLink | EIDE.JLink.InstallDirectory |
| STLink | EIDE.STLink.ExePath |
| Openocd | EIDE.OpenOCD.ExePath |
你可以将 flasher 可执行文件的路径设置到系统环境变量,eide 会找到它
基础配置
在开始配置之前,必须先安装好你的烧录软件
在开始烧录程序之前,您需要检查 flasher 配置
每个 flasher 配置都有一些基本字段,如下所示:
Program File:程序文件路径(xxx.hex, xxx.bin, xxx.s19)格式:
<filepath_1>[,addr_1][;<filepath_2>[,addr_2];...;<filepath_n>]对于这个字段,我们支持一些变量:
${OutDir}: 输出目录
${ProjectName}: 项目名称
${ExecutableName}: 可执行文件输出路径,不含后缀
${ProjectRoot}: 项目根目录
${<EnvVarName>}: `Project Settings` -> `Env Variables` 中的变量
示例:
${ExecutableName}.hex:使用 '${ExecutableName}.hex' 文件进行烧录./bootloader.hex;${ExecutableName}.hex:首先,烧录 './bootloader.hex' 文件,然后烧录 '${ExecutableName}.hex' 文件./bootloader.bin,0x08000000;${ExecutableName}.hex:首先,烧录 './bootloader.bin' 文件到地址 '0x08000000',然后烧录 '${ExecutableName}.hex' 文件./bootloader.bin,0x08000000;${ExecutableName}.bin,0x08100000:首先,烧录 './bootloader.bin' 文件到地址 '0x08000000',然后烧录 '${ExecutableName}.bin' 文件到地址 '0x08100000'
默认值如果这个字段值为 空白,则
${ExecutableName}.hex作为该字段的值多文件烧录上述的多文件烧录仅支持
JLink,OpenOCD,pyOCD烧录器;对于其它类型的烧录器,需要切换至 Custom 烧录器,然后编写脚本自定义烧录流程
特定的配置
每个 flasher 都有其特定的配置
在开始配置之前,必须先安装好你的烧录软件
JLink
CPU Name:JLink 芯片名我们将从
JLink中提取所有可用的 cpu 供您选择点击
更改按钮,将弹出一个列表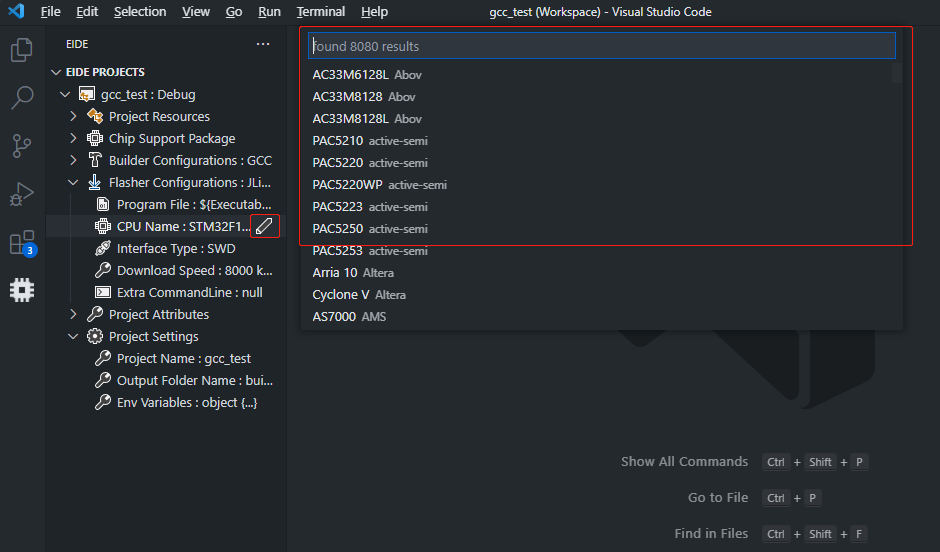
Interface Type:仿真器接口可用值:
SWD
JTAG
cJTAG
FINE
Download Speed:烧录器速率,单位:KHzExtra CommandLine:传递给 JLink 的其他命令行选项示例选项:
-SelectEmuBySN <SN-Code>: It is possible to have multiple J-Links connected to the PC at the same time. Provide theJLink S/N Codefor J-Link Commander to connect to a specific J-Link in an automated way (no user interaction required).
前往 https://wiki.segger.com/J-Link_Commander#Batch_processing 查看更多的选项
STLink
对于 STLink,我们支持两种烧录软件:
ST_Cube_Programmer和STLink_Utility
默认情况下,我们使用ST_Cube_Programmer
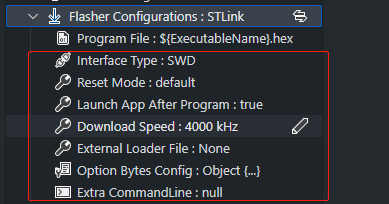
Interface Type:仿真器接口可用值:
SWD, JTAGReset Mode:烧录时的复位类型可用值:
default,software,hardware,core resetLaunch App After Program:烧录结束后启动程序可用值:
true或falseDownload Speed:烧录器速率,单位:KHzExternal Loader File:烧录算法文件(xxx.stldr)Option Bytes Config:选项字节设置Extra CommandLine:其他命令行选项
PyOCD
pyOCD: Python based tool and API for debugging, programming, and exploring Arm Cortex microcontrollers.
安装 PyOCD
https://pyocd.io/docs/installing.html
配置
Target Name:目标 MCU 名称我们将从
PyOCD中提取所有可用的 cpu 供您选择更多信息请参考:target support
Download Speed:烧录器速率可用值:参考 debug probes
默认值:
4MOther Options:pyOCD 配置文件
OpenOCD
OpenOCD, the Open On-Chip Debugger has been created by Dominic Rath as part of a diploma thesis at the University of Applied Sciences, FH-Augsburg. For other material presented on this site, see the respective notes of authorship.
安装
Windows 安装包:https://freddiechopin.info/en/download/category/4-openocd
官方站点:https://openocd.org/pages/getting-openocd.html
我们建议使用 v0.10.0 版本
配置
Chip Config:MCU 配置文件我们将从
openocd中提取所有可用值供您选择Interface Config:调试探针配置文件我们将从
openocd中提取所有可用值供您选择
如何编写 openocd 配置文件:https://openocd.org/doc-release/html/Config-File-Guidelines.html#Config-File-Guidelines
如果你有现成的 xx.cfg 文件,将其放到 <projectRootFolder>, <projectRootFolder>/.eide 或 <projectRootFolder>/tools 文件夹内
插件会找到它们,然后您可以重新选择配置文件
STVP
Only available for
8Bit Project
STVP-STM8 被用来烧录 STM8
CPU Name:STM8 芯片名我们将从
stvp中提取所有可用的 stm8 芯片供您选择eeprom Data File Path:eeprom 数据文件路径必须只包含 ASCII 码,且不能有空格
Option Bytes File Path:stm8 选项字节路径必须只包含 ASCII 码,且不能有空格
STCGAL
STCGAL 是一个为 STC MCU Ltd 8051 芯片而准备的命令行烧录软件
注意: STCGAL 支持有限数量的芯片模型
stcgal should fully support STC 89/90/10/11/12/15/8 series MCUs.

So far, stcgal was tested with the following MCU models:

* STC89C52RC (BSL version: 4.3C/6.6C)
* STC90C52RC (BSL version: 4.3C)
* STC89C54RD+ (BSL version: 4.3C)
* STC12C2052 (BSL version: 5.8D)
* STC12C2052AD (BSL version: 5.8D)
* STC12C5608AD (BSL version: 6.0G)
* STC12C5A16S2 (BSL version: 6.2I)
* STC12C5A60S2 (BSL version: 6.2I/7.1I)
* STC11F02E (BSL version: 6.5K)
* STC10F04XE (BSL version: 6.5J)
* STC11F08XE (BSL version: 6.5M)
* STC12C5204AD (BSL version: 6.6H)
* STC15F104E (BSL version: 6.7Q)
* STC15F204EA (BSL version: 6.7R)
* STC15L104W (BSL version: 7.1.4Q)
* STC15F104W (BSL version: 7.1.4Q and 7.2.5Q)
* IAP15F2K61S2 (BSL version: 7.1.4S)
* STC15L2K16S2 (BSL version: 7.2.4S)
* IAP15L2K61S2 (BSL version: 7.2.5S)
* STC15W408AS (BSL version: 7.2.4T)
* STC15W4K56S4 (BSL version: 7.3.4T, UART and USB mode)
* STC8A8K64S4A12 (BSL version: 7.3.9U)
* STC8F2K08S2 (BSL version: 7.3.10U)
安装
在开始之前,你必须安装 python3 环境
然后执行以下命令安装 STCGAL
pip3 install stcgal --user
然后你可以用以下命令检查是否安装完毕
stcgal -h
配置
eeprom Data File Path:eeprom 数据文件路径必须只包含 ASCII 码,且不能有空格
Extra CommandLine:其他 stcgal 命令行参考 stcgal usage
Other Config:stc 烧录参数
在 stcgal 输出:Cycling power done 之后,你必须复位才能启动一个烧录流程
否则 stcgal 将一直处于等待状态
使用自定义命令烧录
我们支持使用任何 shell 命令来编程您的 flash
Flash Command:当用户触发烧录命令时执行的 shell 命令Erase Chip Command:当用户触发全片擦除命令时执行的 shell 命令
对于 Win32,shell 命令将使用 CMD.exe 执行
对于 Unix,shell 命令将使用 /bin/bash 执行
我们为 Windows 内置了 unix shell 终端,所以你可以直接使用 bash 命令执行命令/脚本来实现复杂的烧录流程
shell 命令有一些可用的变量:
${programFile}:程序文件的路径该变量的值位于
Base Config -> Program File中${port}:可用的串口名(比如:COM1, COMx,ttyUSB0, ttyUSBx)
当可以使用多个程序文件时,以下变量可用:
${programFile[n]}:第 n 个程序文件路径(n从 0 开始)${binAddr[n]}:第 n 个程序文件的烧录地址(n从 0 开始)
一些简单的示例命令:
# execute unix shell script
bash ./xxx/xxx.sh [script arguments...]

# use NuLink to program nuvoton mcu
NuLink -w APROM "${programFile}"

# use stcflash to program stc 8051 mcu
python ./tools/stcflash.py -p ${port} "${programFile}"

# use STM32CubeProgramer + STLink probe to program STM32 mcu
STM32_Programmer_CLI -c port=SWD FREQ=4000 mode=NORMAL reset=SWrst --download "${programFile}" -v --go
编写shell脚本:
如果你的烧录流程比较复杂,含有多个步骤,你也可以自行编写 shell 脚本来执行烧录
首先,在 烧录配置 -> Flash Command UI 中填写: bash ./program_flash.sh "${programFile}"
在工程根目录下新建一个 program_flash.sh 文件,内容如下:
# 要烧录的文件路径
HEX_PATH=$1

# 如果你的脚本需要同时兼容windows和linux环境,
# 你可能需要在这个分支中做一些兼容处理
if uname | grep -qi 'mingw'; then
    # Windows 下会进入这里
    HEX_PATH=$(echo $HEX_PATH | sed 's/\\/\//g') # Windows 下需要将路径中的 \ 转换成 /
else
    # Linux 下会进入这里
fi

echo ==========================
echo - FILE: ${HEX_PATH}
echo ==========================

# 接下来你可以在此处编写你的烧录流程 ....
接下来,在上述脚本中编写你的烧录流程
完成后,点击烧录按钮即可执行烧录
Windows上仅支持有限的unix命令,可用的命令见此处
内建的自定义烧录器
点击自定义烧录器工具栏右侧的按钮即可检索内建的自定义烧录器,选择完毕后,插件会将其安装到你的项目文件夹的 tools 目录中
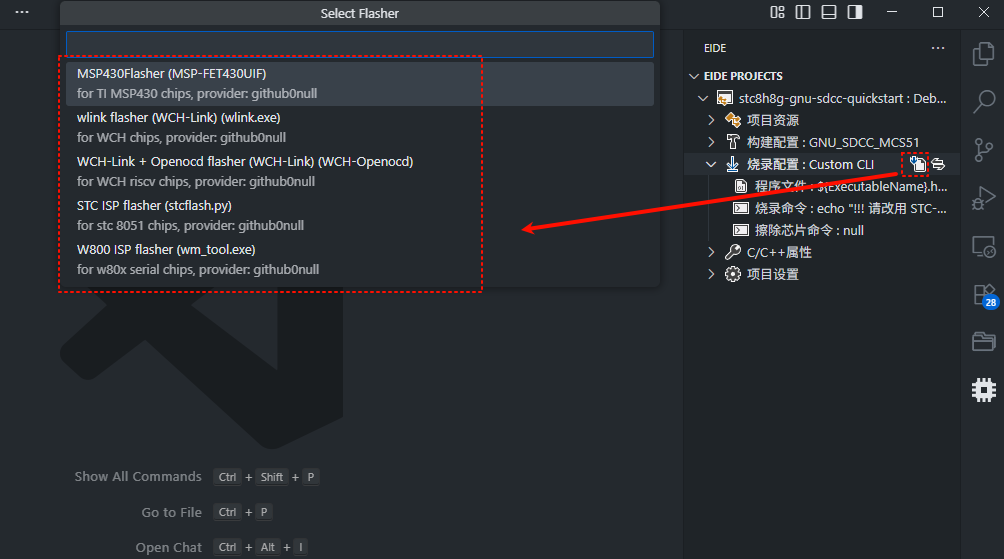
这些工具自带预填充的烧录命令,如果你不打算修改它们,那么接下来你可以点击烧录按钮启动烧录
这些内建的自定义烧录器位于以下仓库中
https://github.com/github0null/eide_shell_flasher_index