Flasher Configurations
Program your code into flash...
We support many flasher for your embedded projects.
| Project Type | Flashers |
|---|---|
| 8BIT Project | stvp for stm8, stcgal, any shell command |
| Arm Project | jlink, stlink, pyocd, openocd, any shell command |
| RISCV Project | jlink, pyocd, openocd, any shell command |
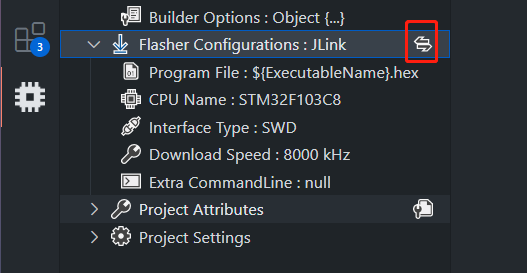
You can switch flasher for your project.
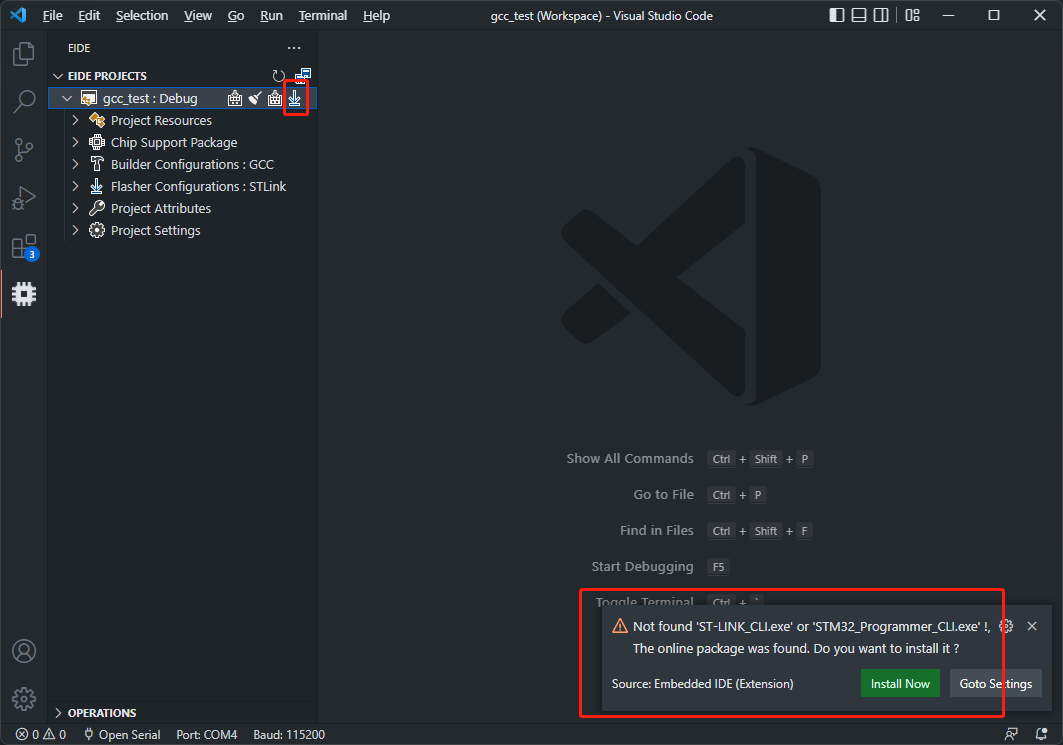
Install Flasher Tools
Flasher tools are not integrated into the EIDE installation package, so you need to install the appropriate flash tool before using the flasher feature.
Click Upload To Device button to start a flash program, we will check you flasher executable and if it's has not been installed, we will pop-up a notification, now you can install or set flasher.
If you want to select an existing installation location for your flashers, you need modify eide's plug-in settings.
The following is a list of plug-in flasher settings:
| Flasher | VSCode Settings ID |
|---|---|
| STVP | EIDE.STM8.STVP.CliExePath |
| JLink | EIDE.JLink.InstallDirectory |
| STLink | EIDE.STLink.ExePath |
| Openocd | EIDE.OpenOCD.ExePath |
You can also set your flasher executable file path to System Environment Variables. plug-in will found it.
Base Configurations
You must install corresponding flasher software before modify your flasher configurations.
Before start to program flash, you need to check your flasher config.

Each flasher configuration has some base fields, as follows:
Program File: program file path, like:xxx.hex, xxx.bin, xxx.s19Format:
<filepath_1>[,addr_1][;<filepath_2>[,addr_2];...;<filepath_n>]For this field, we support some variables:
${OutDir}: Output Directory
${ProjectName}: Project Name
${ExecutableName}: Executable file output path, without suffix
${ProjectRoot}: Project root directory
${<EnvVarName>}: Variables in `Project Settings` -> `Env Variables`
Examples:
${ExecutableName}.hex: use '${ExecutableName}.hex' file to program flash../bootloader.hex;${ExecutableName}.hex: at first, use './bootloader.hex' to program flash, and then use '${ExecutableName}.hex' to program flash../bootloader.bin,0x08000000;${ExecutableName}.hex:at first, use './bootloader.bin' to program flash at '0x08000000', and then use '${ExecutableName}.hex' to program flash../bootloader.bin,0x08000000;${ExecutableName}.bin,0x08100000:at first, use './bootloader.bin' to program flash at '0x08000000', and then use '${ExecutableName}.bin' to program flash at '0x08100000'.
default valueIf the value of this field is blank, the
${ExecutableName}.hexwill be used.Program More Than One FilesOnly support program multi-files for
JLink,OpenOCD,pyOCDflasher.
Specific Configurations
Each flasher has their specific configurations.
You must install corresponding flasher software before modify your flasher configurations.
JLink

CPU Name: JLink device name.We will extract all available cpus from
JLinkfor you to choose.click
modifybutton, a list will popup.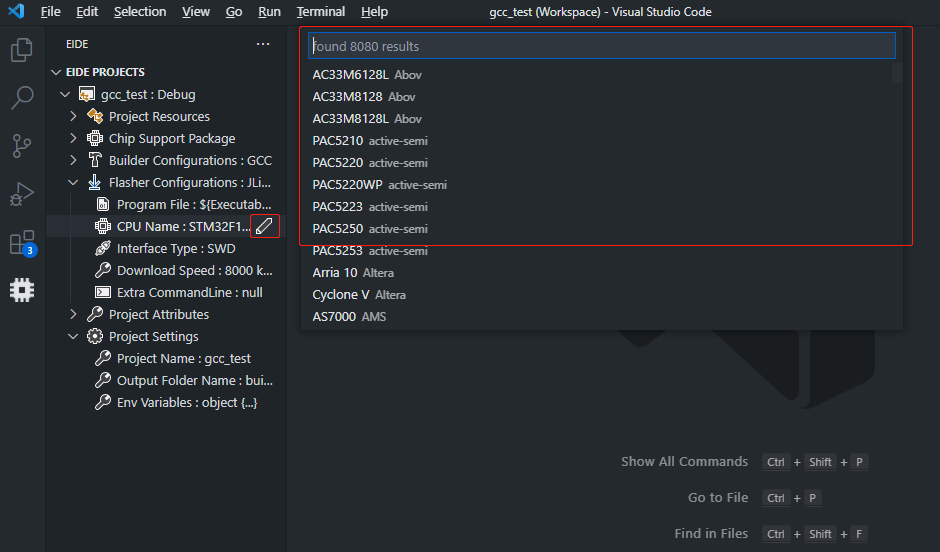
Interface Type: Interface for your debug probe.Available values:
SWD
JTAG
cJTAG
FINE
Download Speed: Frequency of communication for debug probe. Unit:KHzExtra CommandLine: Other commandline options whitch will be passed to JLink.example options:
-SelectEmuBySN <SN-Code>: It is possible to have multiple J-Links connected to the PC at the same time. Provide theJLink S/N Codefor J-Link Commander to connect to a specific J-Link in an automated way (no user interaction required).
goto https://wiki.segger.com/J-Link_Commander#Batch_processing for more commandline options.
STLink
For STLink, we support 2 flasher software:
ST_Cube_ProgrammerandSTLink_Utility.
By default, we useST_Cube_Programmer
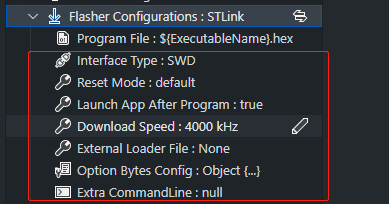
Interface Type: Interface for your debug probe.Available values:
SWD, JTAGReset Mode: Reset type when flash your ST mcus.Available values:
default,software,hardware,core resetLaunch App After Program: Launch your program after flash done.Available values:
trueorfalseDownload Speed: Frequency of communication for debug probe. Unit:KHzExternal Loader File: Programming algorithm file (xxx.stldr).Option Bytes Config: Options bytes for mcus. It's a txt file withiniformat.Extra CommandLine: Other commandline options whitch will be passed tost_cube_programmer.
PyOCD
pyOCD: Python based tool and API for debugging, programming, and exploring Arm Cortex microcontrollers.
Install PyOCD
https://pyocd.io/docs/installing.html
Config

Target Name: Target mcu name.We will extract all available cpus from
pyOCDfor you to choose.For more target, please reference: target support
Download Speed: Frequency of communication for debug probe.Available values: please reference: debug probes
Default value:
4MOther Options: pyOCD config file.Please reference: pyocd config file
OpenOCD
OpenOCD, the Open On-Chip Debugger has been created by Dominic Rath as part of a diploma thesis at the University of Applied Sciences, FH-Augsburg. For other material presented on this site, see the respective notes of authorship.
Install
For Win32: https://freddiechopin.info/en/download/category/4-openocd
Official site: https://openocd.org/pages/getting-openocd.html
We recommend to install v0.10.0.
Config

Chip Config: The configuration file for mcu.We will extract all available values from
openocdfor you to choose.Interface Config: The configuration file for debug probe.We will extract all available values from
openocdfor you to choose.
How To Make An OpenOCD Config File: https://openocd.org/doc-release/html/Config-File-Guidelines.html#Config-File-Guidelines
If you have an openocd xx.cfg file, put it in one of <projectRootFolder>, <projectRootFolder>/.eide or <projectRootFolder>/tools folder.
The plug-in will found them and then you can choose config file.
STVP
Only available for
8Bit Project
STVP-STM8 is used to program flash for STM8 chips.

CPU Name: STM8 chip name.We will extract all available stm8 chips from
stvpfor you to choose.eeprom Data File Path: eeprom data file path for stm8eepromregion.The path must contain only
numbers,letters,-or_.Option Bytes File Path: option bytes config for stm8.The path must contain only
numbers,letters,-or_.
STCGAL
STCGAL is a command line flash programming tool for STC MCU Ltd 8051 compatible microcontrollers.
Notice: The STCGAL supports a limited number of chip models.
stcgal should fully support STC 89/90/10/11/12/15/8 series MCUs.

So far, stcgal was tested with the following MCU models:

* STC89C52RC (BSL version: 4.3C/6.6C)
* STC90C52RC (BSL version: 4.3C)
* STC89C54RD+ (BSL version: 4.3C)
* STC12C2052 (BSL version: 5.8D)
* STC12C2052AD (BSL version: 5.8D)
* STC12C5608AD (BSL version: 6.0G)
* STC12C5A16S2 (BSL version: 6.2I)
* STC12C5A60S2 (BSL version: 6.2I/7.1I)
* STC11F02E (BSL version: 6.5K)
* STC10F04XE (BSL version: 6.5J)
* STC11F08XE (BSL version: 6.5M)
* STC12C5204AD (BSL version: 6.6H)
* STC15F104E (BSL version: 6.7Q)
* STC15F204EA (BSL version: 6.7R)
* STC15L104W (BSL version: 7.1.4Q)
* STC15F104W (BSL version: 7.1.4Q and 7.2.5Q)
* IAP15F2K61S2 (BSL version: 7.1.4S)
* STC15L2K16S2 (BSL version: 7.2.4S)
* IAP15L2K61S2 (BSL version: 7.2.5S)
* STC15W408AS (BSL version: 7.2.4T)
* STC15W4K56S4 (BSL version: 7.3.4T, UART and USB mode)
* STC8A8K64S4A12 (BSL version: 7.3.9U)
* STC8F2K08S2 (BSL version: 7.3.10U)
Install
At first, you need a python3 environment.
then execute these command to install it, as follows:
pip3 install stcgal --user
Then you can check stcgal by this command:
stcgal -h
Config

eeprom Data File Path: eeprom data file path foreepromregion.The path must contain only
numbers,letters,-or_.Extra CommandLine: Other stcgal commandline options.reference: stcgal usage
Other Config: Specific stc flash config.reference: stcgal option keys
After stcgal output a message: Cycling power done, you need reset mcu to start a program flash process.
Otherwise, stcgal will be in the waiting state.
Use Custom Command
We support to use any shell command to program your flash.

Flash Command: The shell command which will be executed when user trigger a program flash process.Erase Chip Command: The shell command which will be executed when user trigger a erase flash process.
For Win32, the shell command will be executed by CMD.exe.
For Linux, the shell command will be executed by /bin/bash.
We have built-in a msys shell terminal environment, so you can execute unix command directly by bash command.
There are some available variables for shell command:
${programFile}: Path for the program file.the value is defined by
Base Config -> Program File${port}: available serial-port name (like:COM1, COMxfor win32;ttyUSB0, ttyUSBxfor linux).
The following variables are available when there are more than one program file that can be used:
${programFile[n]}: Path for the NTH program file (nstarts from zero).${binAddr[n]}: (only forbinfile) Flash start address for the NTH program file (nstarts from zero).
Some examples:
# execute unix shell script
bash ./xxx/xxx.sh [script arguments...]

# use NuLink to program nuvoton mcu
NuLink -w APROM "${programFile}"

# use stcflash to program stc 8051 mcu
python ./tools/stcflash.py -p ${port} "${programFile}"

# use STM32CubeProgramer + STLink probe to program STM32 mcu
STM32_Programmer_CLI -c port=SWD FREQ=4000 mode=NORMAL reset=SWrst --download "${programFile}" -v --go
Write a shell script:
If your flash program process is more complex and contains multiple steps, you can also write your own shell scripts to perform the flash program.
First, open Flasher Configurations -> Flash Command and then setup command: bash ./program_flash.sh "${programFile}"
Then, create a new shell script file program_flash.sh in your project root folder:
# The firmware file path. like: aaa/bbb/ccc/fw.hex
HEX_PATH=$1

# Do some compatibility work for both windows and linux.
if uname | grep -qi 'mingw'; then
    # Windows here
    HEX_PATH=$(echo $HEX_PATH | sed 's/\\/\//g') # Convert '\' to '/' in path for Windows platform.
else
    # Linux here
fi

echo ==========================
echo - FILE: ${HEX_PATH}
echo ==========================

# Next you can write your flash program process here....
Next, write your flash program process in the above script.
When finished, click the program button to perform the flash program.
Only a limited number of unix commands are supported. For available commands, see here