Setup
Install Eide on your pc and setup development envrionment.
Precondition
This plug-in base on VSCode, if you are going to use it, please:
- Make sure you're familiar with VSCode
- Make sure you're familiar with the basic build process of c/c++ project
Because this docs takes the above conditions as the premise.
Install EIDE
In this section, we will guide you on how to properly install EIDE.
We need download some packages from network, make sure your network is ok !
If you need to install offline, please goto Github Release to download installation package.
Open vscode extension market, search
eide, selectEmbedded IDEand install it.
When the plug-in has been installed, it will launch and start to init.
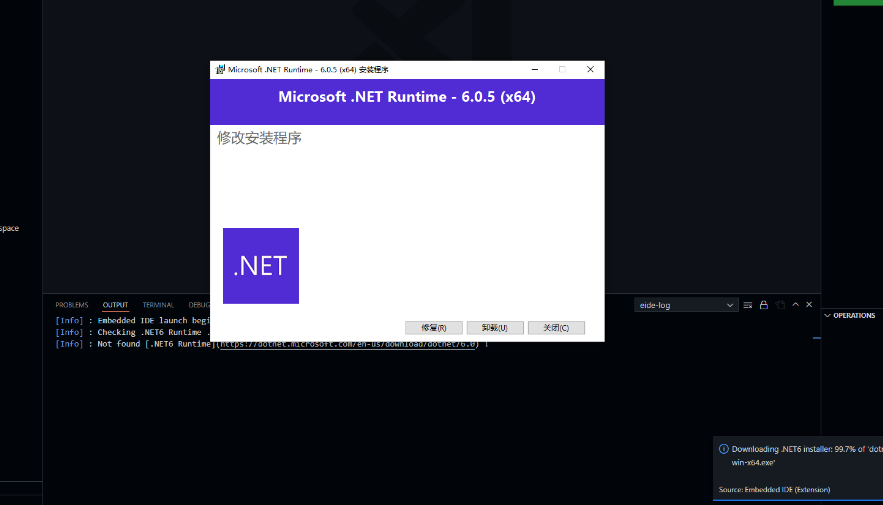
The plug-in will auto download and install eide-binaries and .NET6 X64 Runtime package, please wait !

When
.NET Runtimehas been installed, you need to restart vscode to refreshSystem Environment Variables.EIDE will check
.NET Runtimebefore launch, goto VSCodeOutput Panelto check log.
When you have completed the above operations, EIDE will be installed normally on your computer and we are now ready to begin.
Sometimes, the runtime is installed, but plug-in still prompts that it cannot be found.
You may need close all vscode instances and execute command code . in shell to refresh System Environment Variables.
You can install dotnet to the global environment using the system's package manager. If you are unable to access the package manager, you can follow these steps to install it:
- Run dotnet-install.sh to install.
- Run
ln -s ~/.dotnet/dotnet ~/.local/bin/dotnetto add a symbol link. - Logout and login, then restart vscode.
If you want to install the .NET runtime manually, you must install a version with major version number 6 (e.g. v6.0.5). Click here to download the runtime
Function Region Layout
Now we'll walk you through the functional areas of the plug-in.

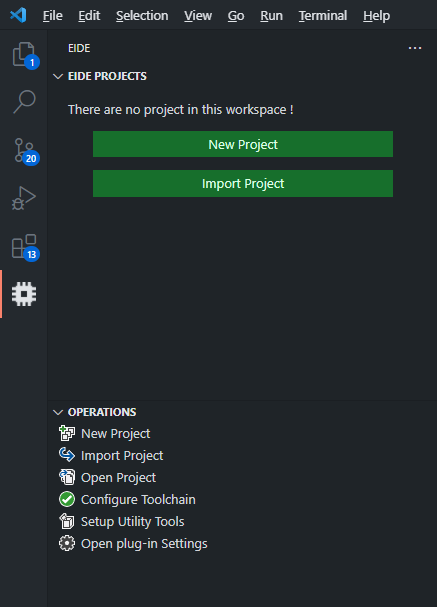
EIDE PROJECTS: Project View
The
EIDE PROJECTSarea will display the projects you have open.
OPERATIONS: Operations View
The
OPERATIONSarea will display someCommon Commandsfor user.
Configure Toolchains
EIDE support many toolchains, but these package is so big, so we not built-in them in plug-in, you need to install manualy.
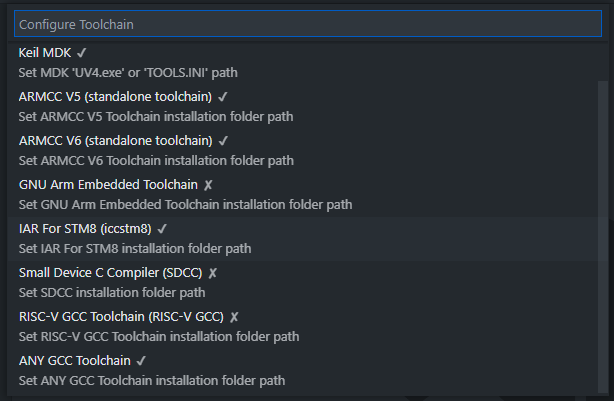
Click Configure Toolchain item in OPERATIONS view.
Then a quickpick box will be pop-up. You need to choose the compiler you want to use and set its installation path.
If you configure done, a check mark '✔' will be appeared after the item.

The Toolchain Installation Folder is the root path for your compiler.
example:
- If your gcc compiler path is:
d:/software/my_toolchain/arm_gcc_10/bin/arm-none-eabi-gcc.exe - Now, you need set
d:/software/my_toolchain/arm_gcc_10as your arm gccToolchain Installation Folderin EIDE.
For Windows platform, EIDE provide some online installation package for Open Source Toolchains.
So you can use Install Utility Tools function or select an existing installation location.
Automatically Detect Toolchains
Each toolchain has a corresponding plugin setting. If its value is "empty", the plugin will automatically detect the available toolchains from the environment variables.
| Toolchain Name | Plugin Setting | The Command Used For Detection |
|---|---|---|
| IAR Arm Compiler | EIDE.IAR.ARM.Toolchain.InstallDirectory | iccarm |
| GNU Toolchain For Arm | EIDE.ARM.GCC.InstallDirectory | ${EIDE.ARM.GCC.Prefix}gcc |
| LLVM For Arm | EIDE.ARM.LLVM.InstallDirectory | clang |
| Arm Compiler V5 | EIDE.ARM.ARMCC5.InstallDirectory | armcc |
| Arm Compiler V6 | EIDE.ARM.ARMCC6.InstallDirectory | armclang |
| Small Device C Compiler | EIDE.SDCC.InstallDirectory | sdcc |
| GNU Toolchain For RISCV | EIDE.RISCV.InstallDirectory | ${EIDE.RISCV.ToolPrefix}gcc |
| GNU Toolchain For MIPS | EIDE.MIPS.InstallDirectory | ${EIDE.MIPS.ToolPrefix}gcc |
| Unknown GCC | EIDE.Toolchain.AnyGcc.InstallDirectory | ${EIDE.Toolchain.AnyGcc.ToolPrefix}gcc |
For Linux Platform
Please use the package manager to install the toolchain, such as apt install arm-none-eabi-gcc, etc
Alternatively, you can append the path of the compiler's bin directory into the system's PATH variable, which can be achieved by modifying ~/.profile.
For Windows Platform
Download the installation package of the corresponding compiler by yourself from the network and execute the installation.
Then open the computer Settings, set the system environment variables, and then append the Path of the compiler's bin directory to the system environment variable: Path.
Then just restart VSCode.